Manual
Login
Our 3D CAD supplier models have been moved to 3Dfindit.com, the new visual search engine for 3D CAD, CAE & BIM models.
You can log in there with your existing account of this site.
The content remains free of charge.

Top Links
Manual
 |
Accessory parts are defined in two sections. On the one hand there is the usual PSOL accessory solution (PARTproject -> tabbed page Links -> Links to parts) and on the other a mechanism that links accessory data with the electrical classification.
Example: Phoenix Connector with 4 Crimp Connections. In each Crimp connection, principally a whole string of different pins with specific article number can be plugged. These are not necessarily identical for each connection.

At the Base part, set all Mounting Points needed for the accessory parts.
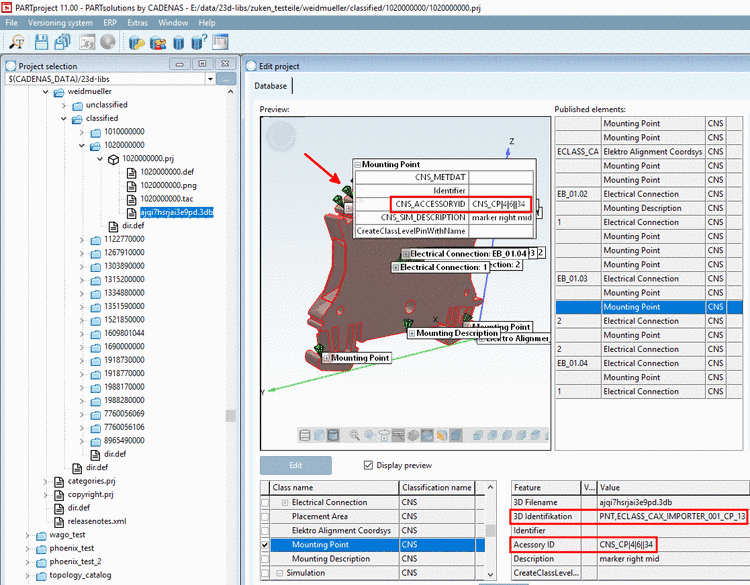
On each connection point, set the class Mounting Point (CNS_CP|4|6).
-
Assign the feature Accessory ID with a unique value using following syntax:
CNS_CP|4|6||<Instanz>
Dialog "Class variables" -> Class "Mounting Point" (CNS_CP|4|6) -> Feature "CNS_ACCESSORYID" here with exemplary value "CNS_CP|4|6||34"
Dialog "Published Elements" -> Class "Mounting Point" -> Feature "Accessory ID" here with exemplary value "CNS_CP|4|6||34"
-
In PARTproject, on the tabbed page Links, under Links to parts, set an entry with Path to accessory part and Id, showing exactly the same value as feature CNS_ACCESSORYID under class Mounting Point (CNS_CP|4|6).
-
At accessory part, fill out the essential information in CNSELEK|5|4.
Feature Parent classType gets the name of respective classification.
Feature Parent class instance gets the instance of respective classification.
-
Feature CNS_ACCESSORYID gets again the same unique identifier string as at base part and in this way is linked with the PSOL accessory path.
CNS_CP|4|6||<Instanz>
One possible form of CNS_ACCESSORYID is the concatenated string of Parent class Type and Parent class Instance.
-


![[Note]](/community/externals/manuals/%24%7Bb2b:MANUALPATH/images/note.png)
Details on this can be found under Section 5.13.10.8, “Accessory parts (Associated Part [CNSELEK|5|4])”.
